
7 Moves to Combat Wrist Pain
8 min readWe rely on our wrists for so much of what we do: using cellphones, typing, taking care of the yard, and crushing our gym workouts and weekend adventures. Rock climber and adventure photographer Savannah Cummins knows this well. “I depend on my wrist for my daily life and my job,” she says. “I’ve always focused on my shoulders and fingers: how to manage pain, overuse, and traumatic injuries in these parts of my body. But I hadn’t put much thought into preventing a wrist injury.” Then, earlier this year, she underwent surgery on her wrist to repair damaged cartilage and bone from overuse and small, repetitive traumas.
Fortunately, you can build the integrity of your whole upper body to improve performance and resolve dysfunction in the wrist. Common injuries like carpal tunnel syndrome, triangular fibrocartilage complex (TFCC) damage, and general pain and stiffness can all be addressed with similar strategies: understanding the anatomy of the wrist, learning how to soothe pain, and mobilizing and strengthening muscles and tendons from your fingertips to your shoulders. The moves below are preventative as well, helping you build a solid base of strength and mobility to help avoid injury in the future.
Understanding Wrist Ergonomics

The wrist is complex and delicate. Eight small, bead-like carpal bones connect to the two lower-arm bones—the ulna and the radius—and to the metacarpal bones of the hand. Numerous muscles, ligaments, tendons, and connective tissue sheaths course through this area, woven in with arteries, veins, lymph vessels, and nerves. Pain and injury in this high-demand area often stem from the bones and soft-tissue structures undergoing repetitive compression, friction, or strain due to everyday movements.
Proper wrist ergonomics is your first line of defense against injury, especially at your keyboard and when lifting or pushing anything, from strollers to groceries. In general, our joints benefit from proper alignment and maintaining the space between skeletal connections. This means avoiding unnecessary collapse or compression of the sensitive anatomical structures of the wrist. Our tendons, ligaments, and muscles are happiest when they’re gliding, contracting, and relaxing in healthy patterns. Proper alignment preserves the cartilage (which our body can’t grow more of) between the joints and prevents excess wear and tear over our lifetimes.


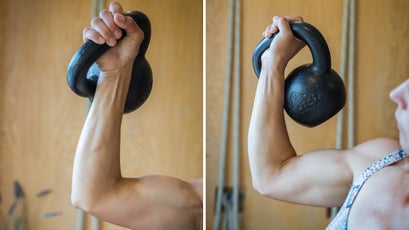
Whether we’re handling a cellphone or punching away at keys, we can do our wrists a favor by maintaining even, proper alignment in all aspects of the wrist. This ensures that certain areas aren’t constantly working overtime.

You can see that the problematic position in the photo to the right involves a “rolled inward” shoulder joint and elbow joint center. The wrist is also bent, causing structures like the wrist and finger extensor and flexor tendons to have to work harder under excess strain. These imbalances lead to injuries like carpal tunnel syndrome.
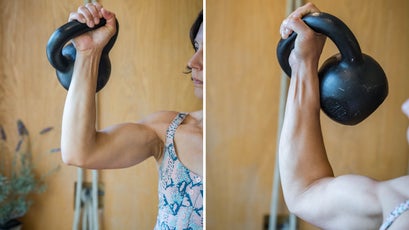
(Savannah Cummins)
Notice that in the proper position in the photo on the left, all sides of the wrist are even, so your aligned skeletal structure bears the load, rather than your soft tissues. (Certain products, like wrist rests or an ergonomic computer mouse, can help with this.)
The Moves: Wrists and Forearms

Gradual progression is key to injury rehab. With wrists, it’s often best to start with isometric exercises, which involve keeping your joints still and contracting muscles from that static position. The stable position allows you to tolerate heavier loads, which helps with pain reduction and tissue remodeling. Loaded strengthening signals the body to repair damaged tissue and replace it with strong, well-aligned material, so you can get back to using your wrists without pain.
Make sure to stay light with the loads and avoid any discomfort. Immediately after performing these movements, your range of motion should increase or, at the very least, stay intact. If it’s reduced, then the exercise isn’t beneficial for you at this point in your recovery.
Isometric Wrist Extension
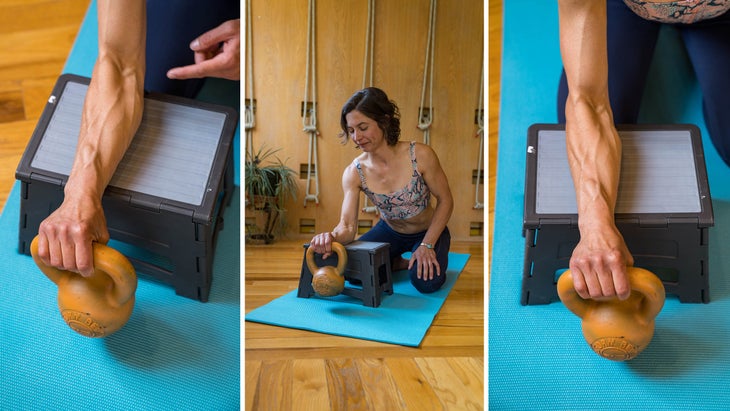
What it does: Helps restore range of motion, which is especially crucial with wrists because they tend to get stiff.
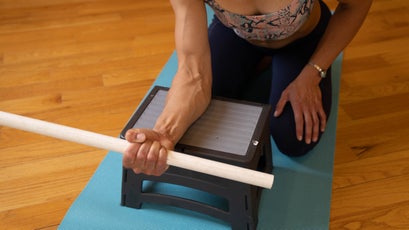
How to do it: Prop your elbow at 90 degrees, and focus on maintaining alignment at the wrist, arm, and shoulder; don’t collapse or pinch at any of the joints, and keep your shoulder, elbow, and wrist in the same plane. Choose a weight that you can hold stable for 45 to 60 seconds—if you can hold it for much longer, it’s too light. You can do this exercise kneeling or standing, depending on the height of the step, table, or chair you use to prop your arm.
Volume: One to three sets of three to five repetitions, with a 60-second rest between repetitions. You can spread these sets out throughout the day. Perform this sequence three to five days a week.
Isotonic Pronation and Supination

What it does: Challenges your ability to maintain a stable upper arm while isolating two motions of the lower arm called pronation (palm down) and supination (palm up). Try this exercise when your wrist can tolerate more dynamic motion with load.
How to do it: Prop your elbow at 90 degrees, and focus on maintaining alignment at the wrist, arm, and shoulder. Choose a levered weight with one lighter and one heavier end, like an adjustable dumbbell or a hammer, that you can rotate through the entire range of motion without breaking your form. Aim to stop a few repetitions before failure. The key with this exercise is to isolate the rotation feature of your forearm and maintain a stable shoulder and elbow, all while keeping the wrist in proper alignment during the entire range of motion. You can do this exercise kneeling or standing, depending on the height of the step, table, or chair you use to prop your arm.
Volume: Perform one to three sets of eight to ten repetitions in each direction, resting 60 seconds between sets. Do this sequence three to five days a week.
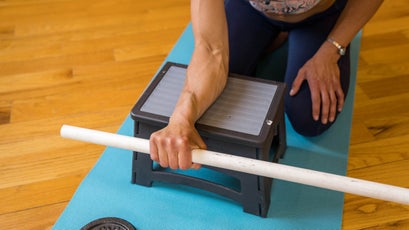
Band Spiderman
What it does: Lets you practice pushing and pulling through resistance while maintaining alignment in your upper arm and shoulder while performing full-arm reaching motions.
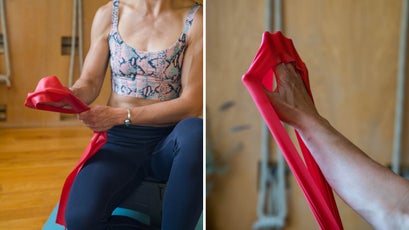
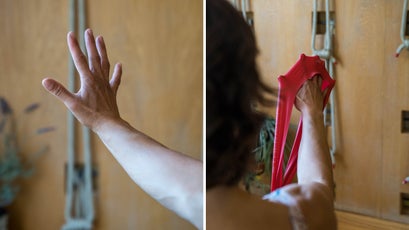
How to do it: Fold the band and grasp it with one hand six to eight inches from the looped end. Place the fingertips of your other hand in the center of the band. Begin with your palm facing downward and all fingers closed together in a “bird beak” shape, then press into the band from your whole arm, wrist, and fingers as you spread your hand wide and extend your arm fully forward. Return to the start position.
Volume: One to three sets of ten to 15 repetitions, three to five times a week.
Band Popeye Curl
How to do it: Fold an exercise band in half and grasp it six to 12 inches from the looped end. Extend the other arm forward at a 45-degree angle, with your palm up, and place those fingertips in the center of the band. Begin with all fingers in an open stretched-back position, then curl your hand into a fist against the resistance, moving steadily into a full biceps curl with your whole arm, wrist, and fingers. Keep resistance on the band as you slowly return to the start position.
Volume: One to three sets of ten to 15 repetitions, three to five times a week.
The Moves: Shoulder Support

Many forces drag us down into a forward and internally rotated shoulder position. This perpetuates abnormal stress and strain upstream and downstream, from the neck down to the wrists. The following exercises help to balance your shoulder and entire upper body, offsetting your repetitive patterns and aiding in injury prevention at your wrists.
Subscapularis Stretch
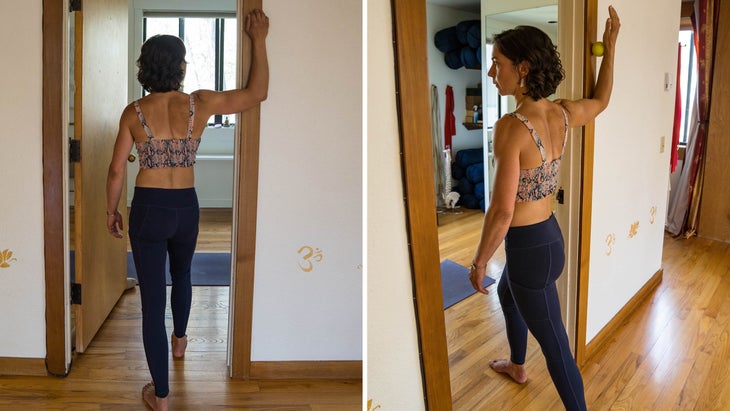
What it does: Stretches the front of your chest and the back of the armpit, where the subscapularis muscle is located.
How to do it: You’ll need a doorway and a tennis ball to perform this stretch. Place your forearm on the wall or door frame, and position the tennis ball just below the wrist, which helps to prop the shoulder in external rotation. Lunge gently through the doorway, and rotate your gaze, chest, and trunk away from the stretching shoulder. Hold for 30 to 60 seconds.
Volume: Perform one to three repetitions on each side, three to five days a week.
External Rotation with Band, Cable, or Weights
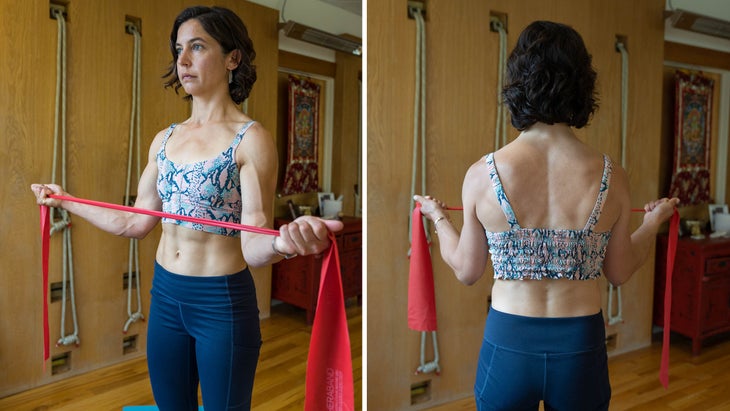
What it does: Strengthens the shoulder muscles through external rotation, opens the chest, and tones the back of the shoulders, all from a stable shoulder position.
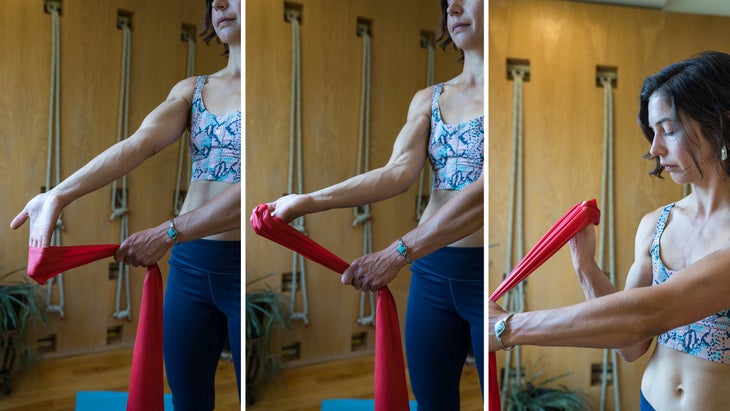
How to do it: While standing, grasp the middle of a resistance band with your hands about six inches apart, palms up. Maintain a tall spine and focus on keeping your wrists aligned here as you pull the band apart, keeping your forearms level. Choose a resistance band that you can pull through the entire range of motion without breaking your form, and aim to stop a few reps before failure. You can also do this exercise using free weights, one arm at a time. Lay on one side on the ground, holding the weight in your upper arm and rotating it through the same motion.
Volume: Perform one to three sets of eight to ten reps, resting 60 seconds between sets. Do this exercise three to five days a week.
Fists and Fingertips Plank
What it does: Builds strength in the wrists, shoulders, and throughout the core and offers a good test of wrist recovery. If you can support your bodyweight in a strong plank without discomfort, both on your fingertips and from your fists, that’s a sign of good wrist health.
How to do it: Stack your hands directly under your shoulders, maintain your wrist and shoulder alignment across all aspects, and extend your feet into a high plank. Draw each hand into a fist or, for fingertips, lift until you’re holding your bodyweight on your fingertips, with your fingers splayed open for stability. Keep your shoulder blades firmly held across your back and engage your core by pulling your low belly in and up. Breathe. Hold for a few seconds to begin with and progress to 30-to-60-second holds as your wrists allow. You can make this exercise easier by elevating your hands on a step or a chair, which unloads some of the weight from your wrists.
Volume: One to three holds in each position, three to five times a week.
Our wrists help us to navigate and perform in this demanding world. When dealing with pain or injury, give your body the benefit of the doubt that it is capable of healing—you just need to supply the appropriate environment and stimulus.
“The healing process is fascinating to me,” Cummins says.” “With the right tools, healthy eating, proper sleep, and a good physical therapist, I experience improvement almost every day.”
Esther Smith, DPT, Cert. MDT, is a doctor of physical therapy who has specialized in treating athletes, specifically rock climbers, for the past decade. She is a storyteller, a mountain athlete, and a high-performance coach for samsaraexperience.com. You can find Smith’s written and video resources catalogued on grassrootsselftreatment.com and learn more about her physical therapy practice at Grassroots Physical Therapy.


